Unlock Your IoT Potential: Mastering SSH For Raspberry Pi Projects
In today's interconnected world, the Internet of Things (IoT) is transforming how we interact with our environment, from smart homes to industrial automation. At the heart of many innovative IoT solutions lies the humble yet powerful Raspberry Pi. When combined with Secure Shell (SSH), this compact computer becomes an unparalleled tool for remote management and development, opening up a world of possibilities for your SSH Raspberry Pi IoT projects. This comprehensive guide will delve into the synergy of Raspberry Pi and SSH, empowering you to manage your IoT devices securely and efficiently from anywhere.
Whether you're a seasoned developer, a curious hobbyist, or just starting your journey into the world of embedded systems, understanding how to leverage SSH for your Raspberry Pi is a game-changer. It eliminates the need for a physical monitor, keyboard, and mouse, allowing for truly headless operations and remote development. This guide aims to provide you with the knowledge and practical steps to master SSH, ensuring your IoT endeavors are not only innovative but also secure and streamlined.
Table of Contents
- The Foundation: Why Raspberry Pi is Perfect for IoT
- Understanding SSH: Your Secure Gateway to Remote Control
- Setting Up SSH on Your Raspberry Pi: A Step-by-Step Guide
- Securing Your SSH Connection: Best Practices for IoT Devices
- Advanced SSH Techniques for Enhanced IoT Projects
- Real-World SSH Raspberry Pi IoT Projects and Use Cases
- Free Remote SSH Options and Mobile Access for IoT
- Conclusion
The Foundation: Why Raspberry Pi is Perfect for IoT
The Raspberry Pi has revolutionized the world of DIY electronics and embedded computing. **The Raspberry Pi is a small, affordable computer that's perfect for IoT projects.** Its low cost, compact size, and powerful capabilities make it an ideal choice for a wide array of applications, from simple sensor monitoring to complex home automation systems. Unlike traditional microcontrollers, the Raspberry Pi runs a full-fledged operating system, typically a variant of Linux (like Raspberry Pi OS), which provides a familiar environment for programming and system management. This versatility, combined with its GPIO (General Purpose Input/Output) pins, allows it to interact directly with physical components like sensors, actuators, and displays, making it a true workhorse for IoT development. Its active community and extensive documentation further enhance its appeal, providing a wealth of resources for beginners and experts alike. Whether you're building a smart garden, a weather station, or a remote surveillance system, the Raspberry Pi offers the flexibility and processing power needed to bring your ideas to life.Understanding SSH: Your Secure Gateway to Remote Control
At its core, SSH, or Secure Shell, is a cryptographic network protocol that enables secure data communication between two networked devices. **Secure Shell (SSH) provides a secure way** to connect to a remote computer, execute commands, and transfer files over an unsecured network. For Raspberry Pi users, SSH is an indispensable tool, allowing you to manage your device remotely without needing a physical connection. Think of SSH as a secure tunnel. When you connect to your Raspberry Pi via SSH, all communication – your commands, the Pi's responses, and any file transfers – are encrypted. This prevents eavesdropping and tampering, which is crucial, especially for IoT devices that might be deployed in various environments. **It allows you to send commands, transfer files, and even perform remote development, writing code and modifying your Raspberry Pi and other devices connected to the GPIO pins through a headless configuration.** This capability is what truly unlocks the potential for complex and distributed IoT projects. **By harnessing the power of SSH, the need for physical presence at the device location is eliminated, saving considerable time and valuable resources.** Imagine having to travel to a remote location just to tweak a line of code on your IoT sensor. With SSH, you can do it from the comfort of your home or office. This remote accessibility is not just a convenience; it's a fundamental requirement for scalable and efficient IoT deployments. **Whether you’re managing a home server, running IoT projects, or experimenting with coding, SSH allows you to securely connect to your Raspberry Pi without needing** a monitor, keyboard, or mouse, making it an essential skill for anyone serious about **SSH Raspberry Pi IoT projects**.Setting Up SSH on Your Raspberry Pi: A Step-by-Step Guide
**Setting up SSH on Raspberry Pi** is a straightforward process, but it's critical to get it right to ensure secure and reliable remote access. This section will guide you through the initial setup, ensuring you can connect to your Pi without hassle. The first step is to ensure SSH is enabled on your Raspberry Pi. If you're using a fresh installation of Raspberry Pi OS (formerly Raspbian), SSH might be disabled by default for security reasons. **There are a few ways to enable SSH:** 1. **Using Raspberry Pi Imager:** When flashing your SD card with Raspberry Pi OS, the Imager tool now includes an option to pre-configure SSH. Look for the "Advanced options" (usually by pressing Ctrl+Shift+X or clicking the gear icon). Here, you can enable SSH, set a username and password, and even configure Wi-Fi credentials. This is often the easiest method for a headless setup. 2. **Via `raspi-config` (on the Pi itself):** If you have a monitor and keyboard connected to your Raspberry Pi, you can enable SSH through the command line. Open a terminal and type `sudo raspi-config`. Navigate to "Interface Options" > "SSH" and select "Yes" to enable it. 3. **Manually (for headless setup without Imager):** After flashing your SD card but before booting the Pi, you can create an empty file named `ssh` (no extension) in the `boot` partition of the SD card. When the Raspberry Pi boots, it will detect this file and automatically enable the SSH server. Once SSH is enabled, you'll need to find your Raspberry Pi's IP address on your local network. You can do this by logging into your router's administration page, using a network scanner tool (like Angry IP Scanner), or, if you have a display connected to your Pi, by typing `hostname -I` in the terminal. **This guide will walk you through the process step by step, ensuring you can download and set up SSH for your Raspberry Pi IoT device without any hassle.**Initial Configuration for Headless Operation
For many IoT projects, your Raspberry Pi will operate "headless" – without a monitor, keyboard, or mouse. This is where SSH truly shines. After enabling SSH using one of the methods above and noting your Pi's IP address, you can connect from your computer. On Linux or macOS, open a terminal and use the command: `ssh username@your_pi_ip_address` (e.g., `ssh pi@192.168.1.100`) On Windows, you can use the built-in OpenSSH client in PowerShell or Command Prompt, or a third-party client like PuTTY. If using PowerShell, the command is the same as Linux/macOS. The first time you connect, you'll be asked to confirm the authenticity of the host. Type `yes` and press Enter. Then, you'll be prompted for the password for the specified username (default is `raspberry` for the `pi` user). Once authenticated, you'll be presented with a command-line interface, giving you full control over your Raspberry Pi.Connecting from Different Operating Systems (Windows, Linux, macOS)
Connecting to your Raspberry Pi via SSH is largely similar across different operating systems, though the tools you use might vary slightly. * **Linux/macOS:** These operating systems come with OpenSSH client pre-installed. You just need to open your terminal and use the `ssh` command as described above. * **Windows:** Modern Windows versions (Windows 10 and 11) include an OpenSSH client that can be enabled via "Optional features" in Settings. Once enabled, you can use `ssh` commands directly in PowerShell or Command Prompt. Alternatively, the popular free client PuTTY remains a strong choice, offering a graphical interface for managing SSH connections. You simply enter the Pi's IP address and port (default 22) and click "Open." **In conclusion, mastering SSH for remote IoT Raspberry Pi download free Windows** is a valuable skill that can significantly enhance your projects. The ability to seamlessly connect from your preferred operating system ensures flexibility in your development workflow.Securing Your SSH Connection: Best Practices for IoT Devices
While SSH provides a secure tunnel, the security of your IoT project ultimately depends on how you configure and use it. IoT devices are often targets for cyberattacks due to their widespread deployment and sometimes lax security. Therefore, implementing best practices for securing your SSH connections is paramount. **Learn how to set up, secure, and troubleshoot SSH for your IoT projects** to prevent unauthorized access. Here are essential security measures: 1. **Change Default Credentials:** The default username (`pi`) and password (`raspberry`) are widely known. Change them immediately. You can create a new user with `sudo adduser newuser` and then delete the default `pi` user. 2. **Use SSH Key-Based Authentication:** This is significantly more secure than password authentication. Instead of a password, you use a pair of cryptographic keys: a private key (kept secret on your local machine) and a public key (placed on your Raspberry Pi). SSH will then authenticate you using these keys. This process eliminates the risk of brute-force password attacks. 3. **Disable Password Authentication (After Key Setup):** Once you have key-based authentication working, edit the SSH daemon configuration file (`/etc/ssh/sshd_config`) to disable password authentication. Set `PasswordAuthentication no`. Remember to restart the SSH service (`sudo systemctl restart ssh`) after making changes. 4. **Change the Default SSH Port:** The default SSH port is 22. Attackers often scan for open port 22. Changing it to a non-standard port (e.g., 2222 or any unused port above 1024) can reduce automated scanning attempts. Edit `Port 22` to `Port [your_new_port]` in `/etc/ssh/sshd_config`. 5. **Disable Root Login:** Never allow direct SSH login for the root user. Ensure `PermitRootLogin no` in `sshd_config`. If you need root privileges, log in as a regular user and then use `sudo`. 6. **Implement a Firewall:** Use `ufw` (Uncomplicated Firewall) or `iptables` to restrict incoming connections only to necessary ports and trusted IP addresses. For example, allow SSH only from your home IP address. 7. **Keep Your System Updated:** Regularly update your Raspberry Pi OS (`sudo apt update && sudo apt upgrade`) to patch any security vulnerabilities. **Remember to implement best practices for securing your SSH connections and explore advanced features to maximize its potential.** Neglecting security can turn your innovative IoT project into a vulnerable entry point for malicious actors.Advanced SSH Techniques for Enhanced IoT Projects
Beyond basic remote access, SSH offers a suite of advanced features that can significantly enhance your **SSH Raspberry Pi IoT projects**. These techniques allow for more sophisticated control, secure data transfer, and even remote development environments.Remote Development and File Transfer
One of the most powerful aspects of SSH for IoT is the ability to perform remote development. **It allows you to send commands, transfer files, and even perform remote development, writing code and modifying your Raspberry Pi and other devices connected to the GPIO pins through a headless configuration.** This means you can write and debug code on your local machine and deploy it directly to your Pi without constantly moving files manually. * **`scp` (Secure Copy Protocol):** For simple file transfers, `scp` is invaluable. It works similarly to the `cp` command but over SSH. * To copy a file from your local machine to the Pi: `scp /path/to/local/file username@pi_ip:/path/on/pi` * To copy a file from the Pi to your local machine: `scp username@pi_ip:/path/on/pi /path/to/local/directory` * **`sftp` (SSH File Transfer Protocol):** For a more interactive file transfer experience, `sftp` provides a command-line interface similar to FTP, but secure over SSH. Many graphical FTP clients also support SFTP. * **VS Code Remote Development:** Visual Studio Code, a popular code editor, has powerful "Remote - SSH" extensions. These extensions allow you to connect directly to your Raspberry Pi via SSH and develop as if your code were running locally. This provides a full-featured IDE experience, including syntax highlighting, IntelliSense, and debugging, all while the code resides and executes on your Pi. This is a game-changer for complex IoT applications.Exploring P2P SSH for Distributed IoT Networks
For more complex or distributed IoT networks, traditional SSH setups might face challenges with NAT (Network Address Translation) and firewall configurations. This is where Peer-to-Peer (P2P) SSH solutions come into play. **A deep dive into the world of securely connecting remote IoT P2P SSH Raspberry Pi** reveals innovative ways to bypass these network limitations. P2P SSH allows devices to connect directly to each other, even if they are behind different NATs, without requiring complex port forwarding or VPNs. Solutions like ZeroTier, Tailscale, or even custom SSH tunneling setups can create a virtual private network (VPN) overlay that allows your Raspberry Pis to communicate directly and securely. **From setting up SSH to exploring P2P connections and downloading the necessary software, we’ve covered it all.** These advanced networking techniques are crucial for building robust and scalable IoT ecosystems where devices need to communicate seamlessly across different network environments. **Whether you're a hobbyist, a developer, or a tech enthusiast, mastering remote SSH on Raspberry Pi can elevate your IoT projects to new heights,** allowing you to build truly distributed and resilient systems.Real-World SSH Raspberry Pi IoT Projects and Use Cases
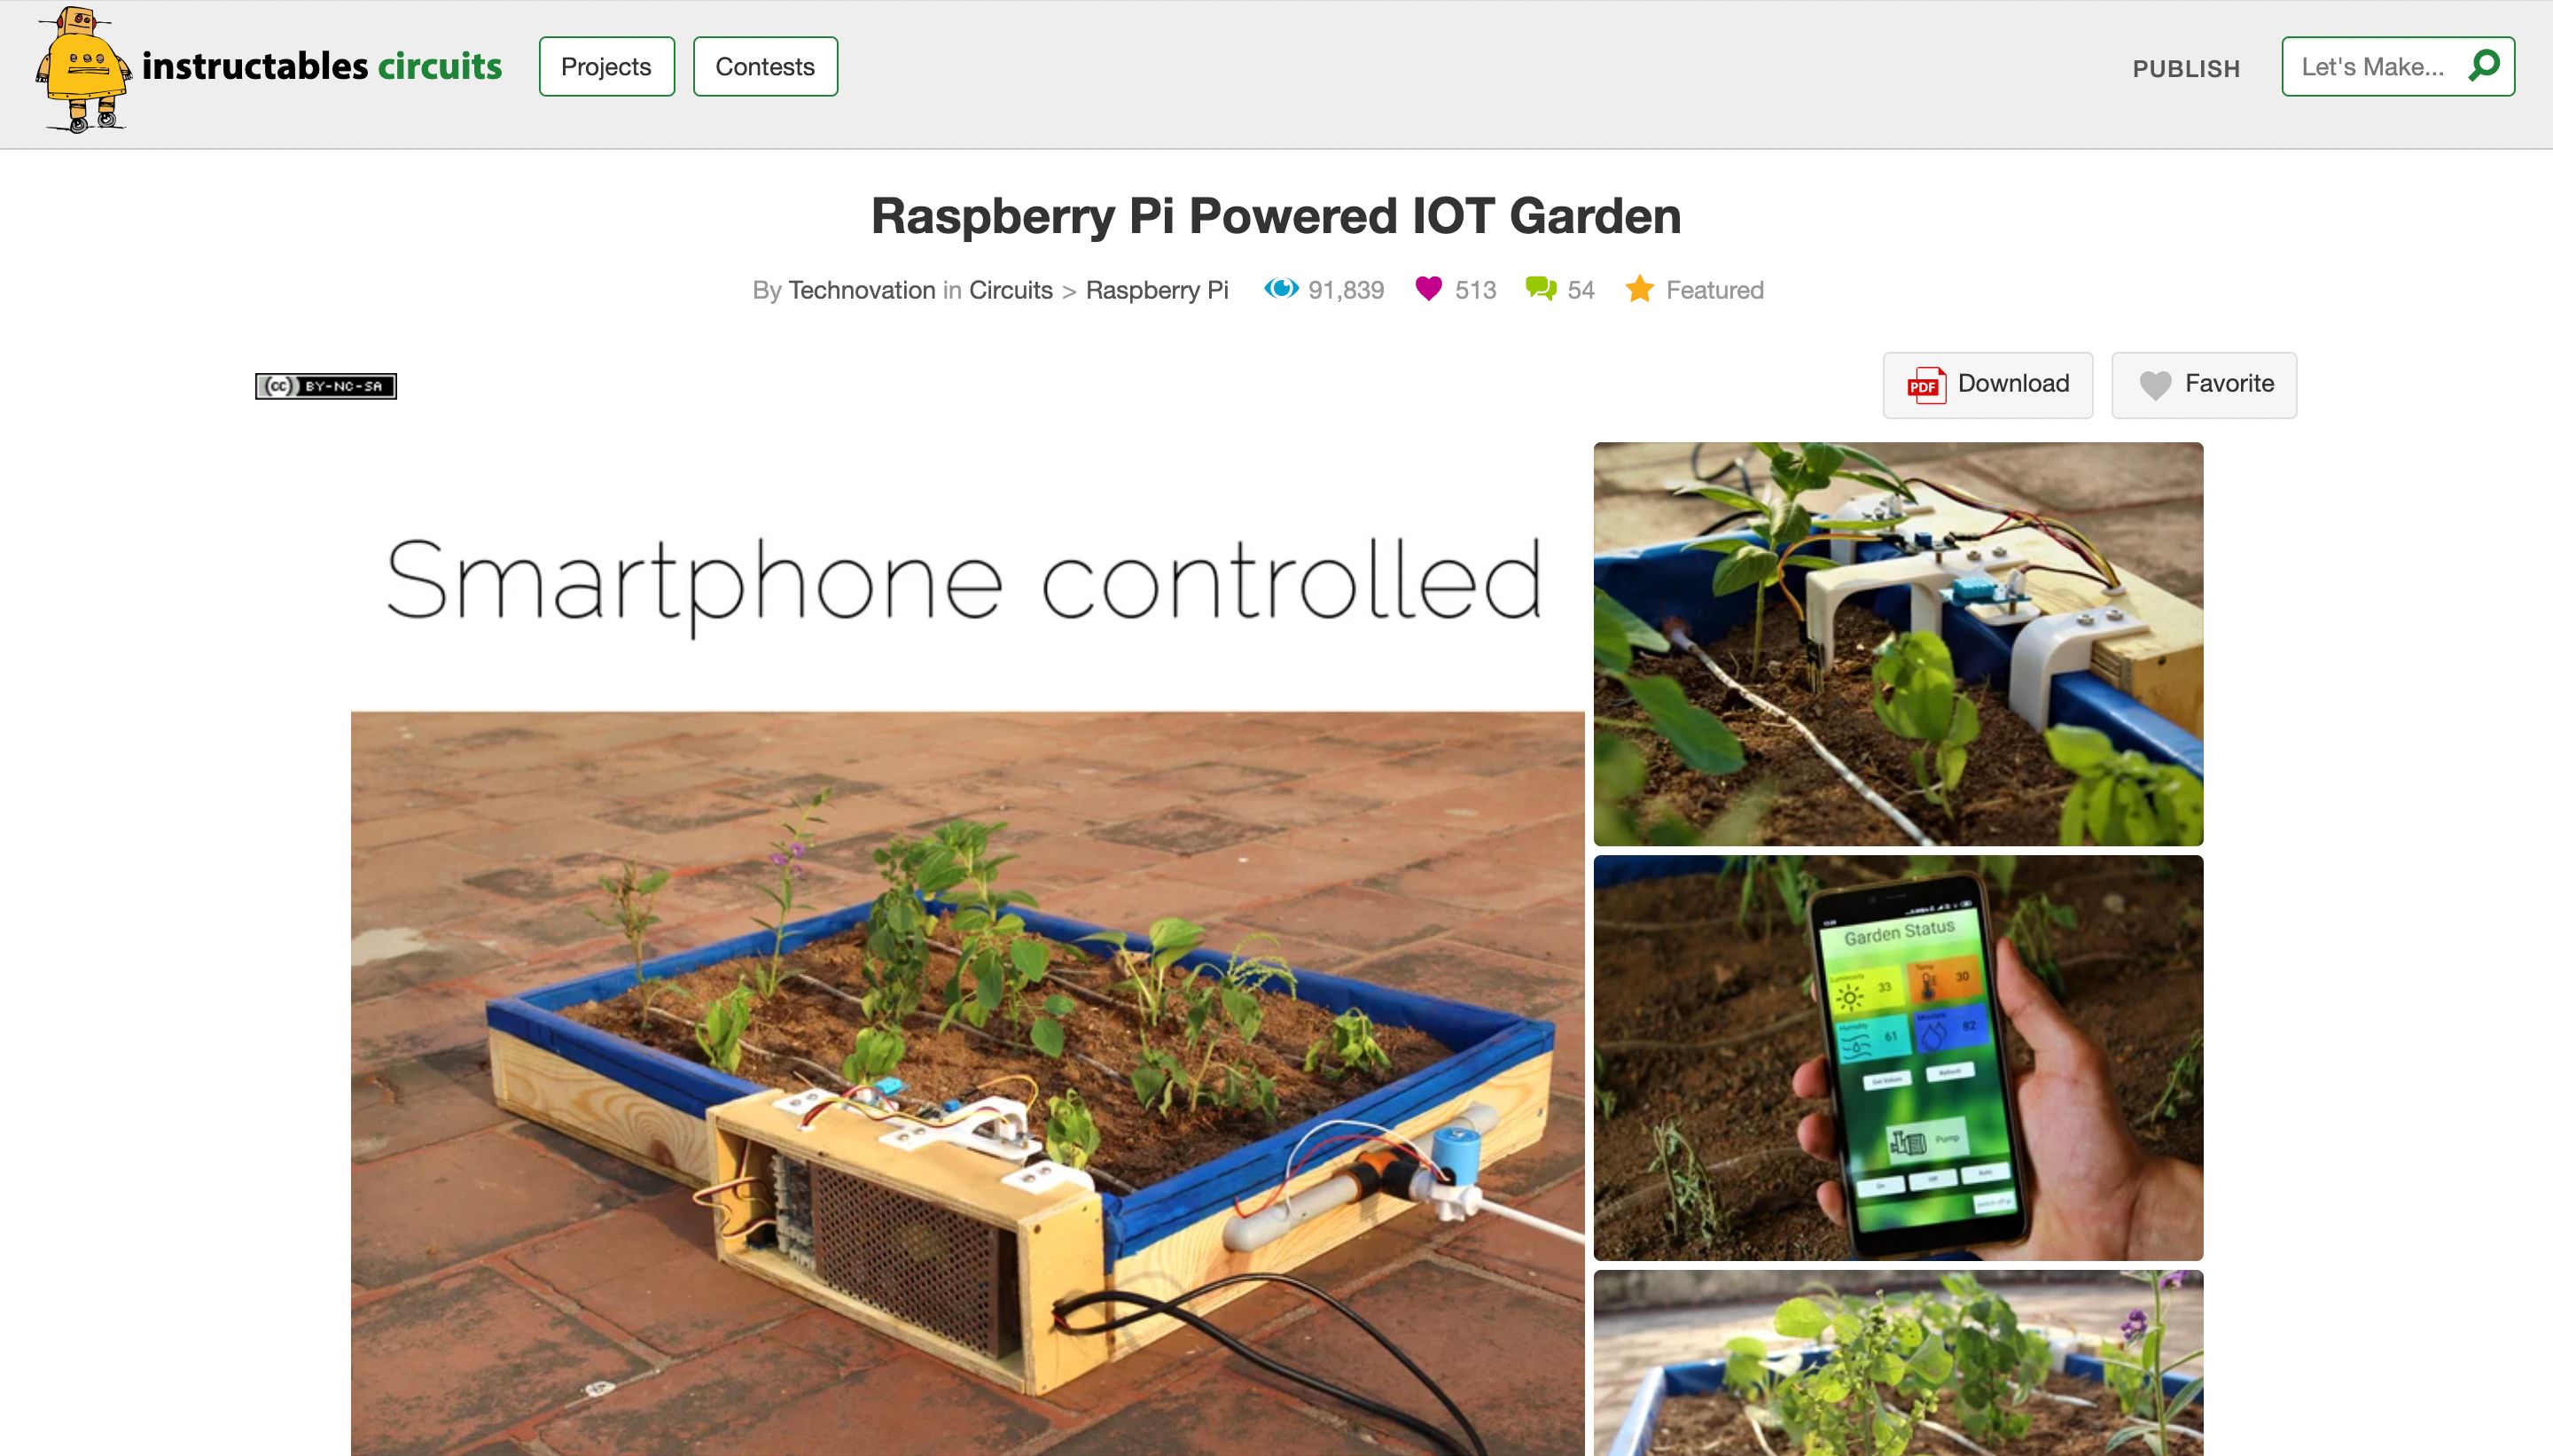
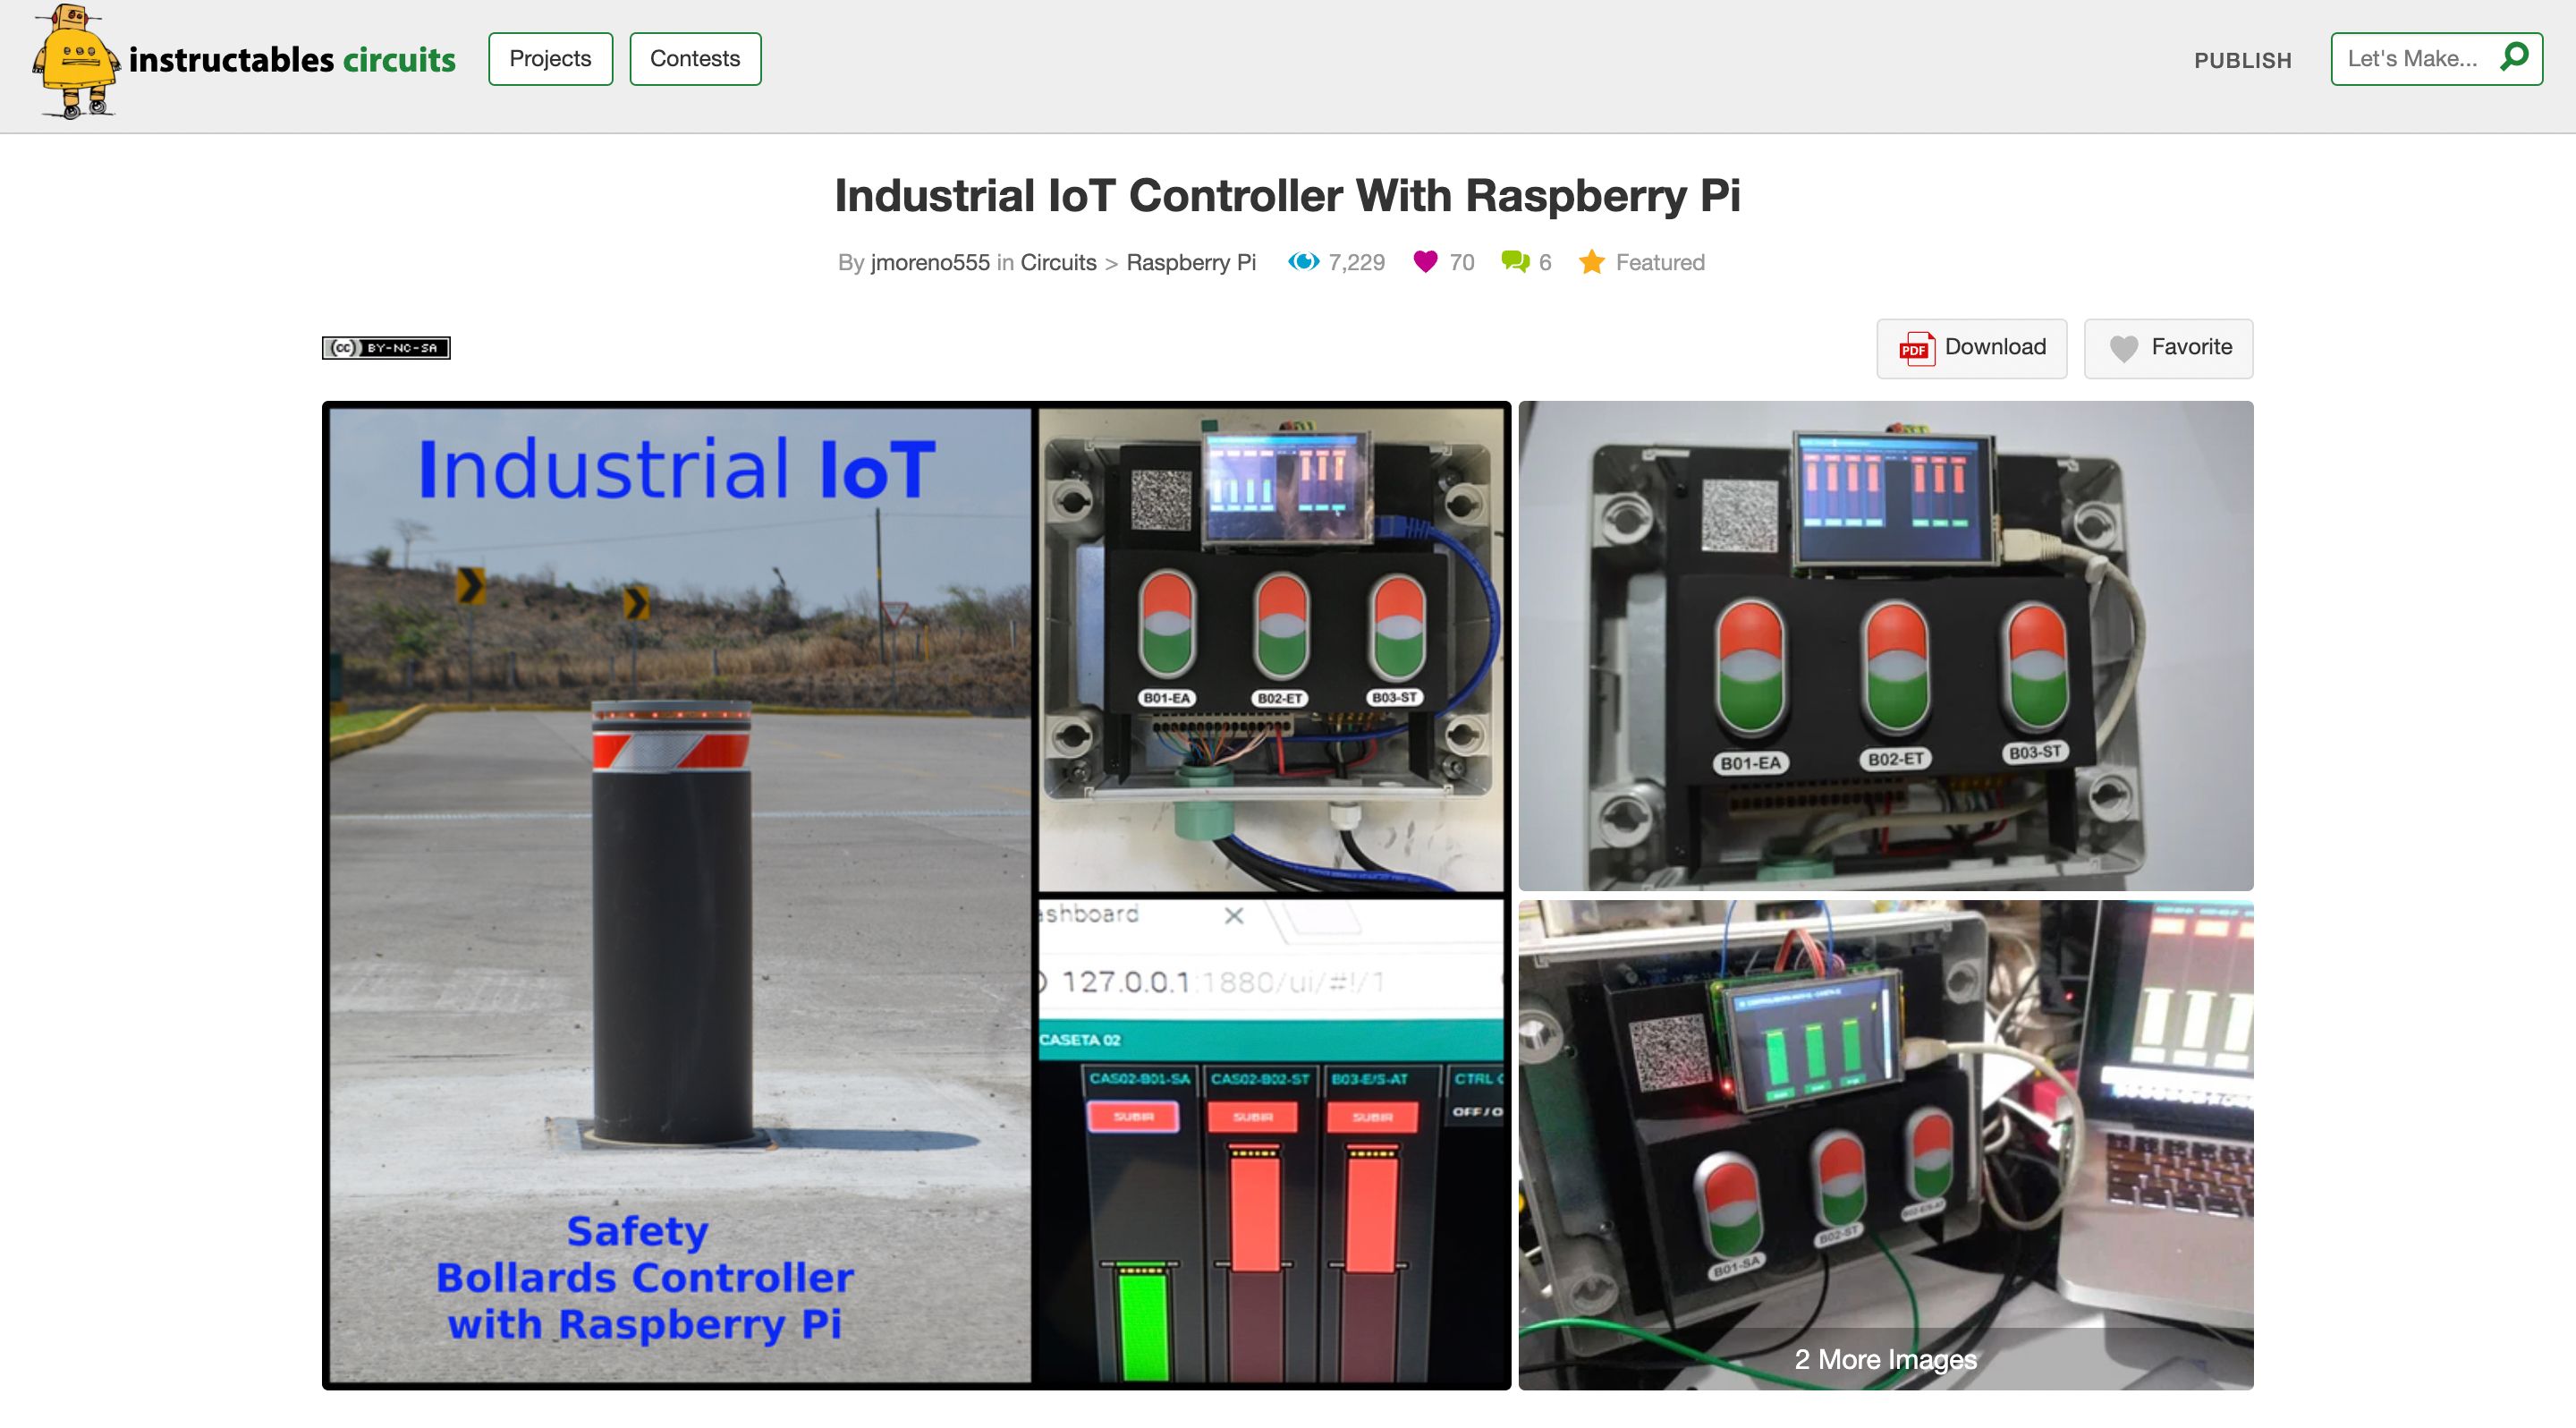
The combination of Raspberry Pi's versatility and SSH's remote capabilities opens up a vast array of practical applications. **Combining IoT with remote SSH on a Raspberry Pi opens up a world of possibilities for innovation and automation.** Here are some real-world examples of **SSH Raspberry Pi IoT projects**: * **Home Automation Hub:** Use a Raspberry Pi as a central controller for smart lights, thermostats, and security cameras. SSH allows you to remotely manage rules, update firmware, and troubleshoot issues without physical access. * **Environmental Monitoring:** Deploy Raspberry Pis with sensors (temperature, humidity, air quality) in various locations (e.g., a greenhouse, a server room, or even outdoors). SSH enables you to collect data, adjust sampling rates, and maintain the devices from a central dashboard. * **Remote Surveillance Camera:** Set up a Raspberry Pi with a camera module for remote monitoring. SSH allows you to access the live feed, record footage, and configure motion detection settings from anywhere. * **Smart Farming/Agriculture:** Monitor soil moisture, nutrient levels, and control irrigation systems in remote fields. SSH facilitates data collection and remote activation of pumps or valves. * **Data Logging and Analysis:** Deploy Pis in industrial settings to collect data from machinery. SSH is used for secure data transfer to a central server for analysis and for managing the data collection scripts. * **Automated Plant Watering System:** Build a system that waters your plants based on soil moisture levels. SSH allows you to check sensor readings, adjust watering schedules, and troubleshoot pump issues remotely. **Ssh remote access is an invaluable tool for managing IoT projects on Raspberry Pi.** It transforms theoretical concepts into tangible, deployable solutions, making it easier to maintain and scale your IoT infrastructure. The synergy of the Raspberry Pi's flexibility and SSH's security creates a robust foundation for modern IoT projects, allowing for innovation and automation across countless domains.Free Remote SSH Options and Mobile Access for IoT
For hobbyists and small-scale projects, finding cost-effective ways to manage remote **SSH Raspberry Pi IoT projects** is essential. Fortunately, there are several free options and methods to access your Pi, even from mobile devices. **Discover the best IoT device remote SSH Raspberry Pi free options with this comprehensive guide.** While direct port forwarding on your router can expose your Pi to the internet (which requires careful security measures), several services offer secure tunnels or VPN-like access without needing public IP addresses or complex router configurations. * **Ngrok:** This service creates a secure tunnel from a public endpoint to your local machine, allowing you to expose your SSH service to the internet without configuring your router. It's great for temporary access or demonstrations. * **Remote.it (formerly Weaved):** This platform provides persistent, secure remote access to your devices behind firewalls and NATs. It’s designed specifically for IoT and offers a free tier for personal use. * **Tailscale/ZeroTier:** As mentioned in the P2P section, these create a virtual private network that connects your devices directly, regardless of their physical location or network configuration. They offer generous free tiers suitable for personal IoT projects. **This guide will walk you through the process of setting up free remote SSH access for your Raspberry Pi, ensuring you can harness the full potential of your IoT projects.** These solutions are changing the way developers and hobbyists interact with IoT devices, making remote management more accessible than ever. **The SSH remote IoT Raspberry Pi free download concept is changing the way developers and hobbyists interact with IoT devices,** offering flexible and secure ways to connect.Accessing Your Pi from Android and Web SSH
The convenience of managing your IoT projects from your smartphone is a significant advantage. **Setting up SSH access for your Raspberry Pi IoT projects from an Android device is easier than you might think.** * **Android/iOS Apps:** There are numerous SSH client applications available for both Android and iOS (e.g., Termius, JuiceSSH, ConnectBot). These apps provide a terminal interface on your phone, allowing you to execute commands, transfer files, and monitor your Pi on the go. They often support SSH key management and connection profiles for quick access. * **Web SSH:** For situations where you don't have a dedicated SSH client or prefer a browser-based interface, web SSH solutions can be useful. These typically involve setting up a web-based terminal on a server (or even on the Pi itself, though less secure for direct internet exposure) that proxies your SSH connection. **Whether you’re new to IoT or an experienced developer, this guide will walk you through the process of configuring remote IoT access using web SSH on a Raspberry Pi.** Services like Shell In A Box or commercial web-based SSH clients can provide this functionality, though care must be taken to secure the web interface itself. These mobile and web-based options provide unparalleled flexibility, allowing you to monitor, troubleshoot, and control your **SSH Raspberry Pi IoT projects** from virtually anywhere with an internet connection.Conclusion
In the dynamic world of the Internet of Things, the ability to remotely manage and interact with your devices is not just a luxury, but a necessity. **Conclusion SSH is a powerful tool for managing IoT projects- Viral Video Link Tarabox
- Kathryn Mae Wiki
- Linda Mcingvale
- Dick Mcdonald Net Worth
- Miss Canada Paternity Test Results Reddit
The 10 Best Raspberry Pi IoT Projects
The 10 Best Raspberry Pi IoT Projects

The 10 Best Raspberry Pi IoT Projects
